
Running a Spring Boot Spark app on Minikube
A step by step tutorial on how to use Spring Boot to run a Spark application on a local Minikube K8S cluster.
I was given a task to investigate some issue with an Apache Spark executor pod running on a Kubernetes (K8S) cluster. Being rather new to Spark and to K8S, my first hunch was to try and run the Spark application on a local K8S cluster using Minikube. I hoped this will give me a better understanding of all the moving parts and help me with debugging.
In this post, I will walk through all the steps I had to take in order to run a Spring-Boot Spark application on a local Minikube K8S cluster. For this example, I created a very simple Spring-Boot application which uses Spark in order to count and output the number of occurrences of each word in a given text file.
Prerequisites:
- Download the Spark + Hadoop bin from the Spark site. For this example I used spark-3.3.2-bin-hadoop3.tgz
- Download and install Minikube. For this example I Used version v1.28.0
- Make sure you have Docker running on your machine.
- We will be using
kubectlfor communicating with our Minikube cluster, but there is no need to download it since it comes shipped with Minikube. - Make sure you have a Java JDK on your machine. On this tutorial I used Java 11.
Project:
Here is the repo of the project I created for this example. I recommend that you clone it in order to follow along with this tutorial.
Once you’ve cloned the project, run mvn clean install from the root directory in order to build it.
Project Structure
I made this project a Maven multi-module project which consists of a parent module and 2 applicative modules:
-
word-count-driver - this is the main Spring-Boot application which receives a text-file input and triggers a Spark job to count its words.
-
word-count-spark-job - this is the code which runs on the executor pods and does the actual heavy lifting of running over the file and counting word occurrences.
The reason I’m using a separate module for the word-count job is that I found that in many cases (especially when running in cluster mode) Spark needs to be provided with the jar of the class which contains the executor logic. Because of the way Spring-Boot packages its jar, this can’t be easily achieved when including the executor logic as part of the Spring-Boot app. Hence, I exported it to a separate module which my Spring-Boot app consumes, and which can be easily packaged and shared with the executor pods.
Let’s quickly review the main project files:
word-count-driver
The Spring-Boot app consists of a single controller:
@RestController
public class WordCountController {

    private final SparkService sparkService;

    @Autowired
    public WordCountController(SparkService sparkService) {
        this.sparkService = sparkService;
    }

    @PostMapping("/word-count")
    public ResponseEntity<String> handleFileUpload(@RequestParam("file") MultipartFile file) throws IOException {
        SparkSession sparkSession = sparkService.getSparkSession();
        byte[] byteArray = file.getBytes();
        String contents = new String(byteArray, StandardCharsets.UTF_8);
        String wordCountOutput = WordCountSparkJob.getWordCount(contents, sparkSession);
        // sparkSession.close();
        return ResponseEntity.ok(wordCountOutput);
    }
}
The wordcount endpoint receives a text file and then passes its contents as well as an initialized SparkSession to the WordCountSparkJob module which is later ran by the executors. You can optionally tell Spark to terminate these executors once the job is done by calling sparkSession.close() (currently commented out).
The SparkService class in the Spring-Boot driver is responsible for configuring and initializing the SparkContext:
@Service
public class SparkService {
    public SparkSession getSparkSession() {
        SparkConf conf = getSparkConfig();
        return SparkSession.builder()
                .config(conf)
                .getOrCreate();
    }

    private SparkConf getSparkConfig() {
        String hostIp;
        try {
            hostIp = InetAddress.getLocalHost().getHostAddress();
        } catch (UnknownHostException e) {
            throw new RuntimeException(e);
        }

        SparkConf conf = new SparkConf();
        conf.setAppName("count.words.in.file")
                .setMaster("k8s://https://kubernetes.default.svc:443")
                .setJars(new String[]{"word-count-spark-job.jar"})
//                .setMaster("local")
//                .setJars(new String[]{"/Users/idafna/dev/projects/tutorials/spring-boot-spark-on-minikube/word-count-spark-job/target/word-count-spark-job-1.0-SNAPSHOT.jar"})
                .set("spark.driver.host", hostIp)
                .set("spark.driver.port", "8090")
                .set("spark.kubernetes.namespace", "default")
                .set("spark.kubernetes.container.image", "spark:3.3.2h.1")
                .set("spark.kubernetes.authenticate.executor.serviceAccountName", "spark")
                .set("spark.executor.memory", "1g")
                .set("spark.executor.instances", "2");

        return conf;
    }
}
In terms of Spark configuration, I went with the bare minimum which was required for this example to successfully run on a Minikube cluster. The “Spark Configuration” and “Running Spark on Kubernetes” docs are great resources for learning more about each of these configuration details. In short, we are telling Spark that it should run it’s tasks using 2 executor pods on a K8S cluster. We are also specifying the namespace and service-account-name we are going to set on the Minikube cluster. We are telling Spark where it can find the jar for the executor code (“word-count-spark-job.jar”) as well as what docker image it should use for spinning up executor pods (“spark:3.3.2h.1”). Soon we will see how to build this image and load it to the Minikube cluster.
Notice the 2 commented-out lines. You can replace them with the 2 lines above them which will allow running the app locally (not in cluster mode) by simply running the SpringSparkAppApplication:
                //.setMaster("k8s://https://kubernetes.default.svc:443")
                //.setJars(new String[]{"word-count-spark-job.jar"})
                .setMaster("local")
                .setJars(new String[]{"{local/path/to/project}/spring-boot-spark-on-minikube/word-count-spark-job/target/word-count-spark-job-1.0-SNAPSHOT.jar"})
word-count-spark-job
Now let’s have a look at the word-count-spark-job module which consists of a single class:
public class WordCountSparkJob {
    public static String getWordCount(String contents, SparkSession sparkSession) {
        Dataset<String> text = sparkSession.createDataset(Arrays.asList(contents.split("[\r\n]+")), Encoders.STRING()).repartition(16);
        Dataset<String> wordsDataset = text.flatMap((FlatMapFunction<String, String>) line -> {
            List<String> words = new ArrayList<>();
            for (String word : line.split(" ")) {
                String normalizedWord = word.replaceAll("[^a-zA-Z0-9]", "").trim().toLowerCase();
                if (!normalizedWord.isEmpty()) {
                    words.add(normalizedWord);
                }
            }
            return words.iterator();
        }, Encoders.STRING());

        // Count the number of occurrences of each word
        Dataset<Row> wordCounts = wordsDataset.groupBy("value")
                .agg(count("*").as("count"))
                .orderBy(desc("count"));

        // Convert the word count results to a List of Rows
        List<Row> wordCountsList = wordCounts.collectAsList();

        StringBuilder resultStringBuffer = new StringBuilder();

        // Build the final string representation
        for (Row row : wordCountsList) {
            resultStringBuffer.append(row.getString(0)).append(": ").append(row.getLong(1)).append("\n");
        }

        return resultStringBuffer.toString();
    }
}
The getWordCount method receives the contents of the text file and a SparkSession which it uses in order to transform the text into a sorted list of unique words and the number of their occurrences in the original text.
Setting up the Minikube cluster
Now, lets run and set up and run our Minikube cluster. Run the following command in the terminal to spin up the cluster:
minikube start driver=docker --cpus 5 --memory 7500At the root of the project you will find this fabric8-rbac.yaml file:
apiVersion: rbac.authorization.k8s.io/v1
kind: ClusterRoleBinding
metadata:
  name: fabric8-rbac
subjects:
  - kind: ServiceAccount
    name: default
    namespace: default
roleRef:
  kind: ClusterRole
  name: cluster-admin
  apiGroup: rbac.authorization.k8s.io
To apply it to the Minikube cluster run the following command in the terminal from the root of the project:
kubectl apply -f fabric8-rbac.yamlThis grants the “default” ServiceAccount in the “default” Minikube namespace cluster-admin permissions which means it will have full access to all Kubernetes resources in the cluster.
Next, let’s create a K8S service account and name it “spark”. Run this command in the terminal:
kubectl create serviceaccount sparkNext, we’ll need to create a cluster-role-binding between our new spark service and the default Minikube service-account and give it edit privileges:
kubectl create clusterrolebinding spark-role --clusterrole=edit --serviceaccount=default:spark --namespace=defaultIf you recall, the last 2 steps correspond to the following configurations on our Spring-Boot app SparkService:
.set("spark.kubernetes.namespace", "default")
.set("spark.kubernetes.authenticate.executor.serviceAccountName", "spark")
Our Minikube cluster is now ready for loading our executor and driver images and deploying our application.
Building and loading the images:
First let’s build the Docker image Spark will use for running the executor pods:
Spark ships with a bin/docker-image-tool.sh script that can be used to build the executor Docker image to use with K8S. Run the following command from the root of the Spark-Hadoop bin you downloaded to your local machine (see prerequisites):
./bin/docker-image-tool.sh -t 3.3.2h.1 buildThis should create a Docker image on your machine named: spark:3.3.2h.1. I chose 3.3.2h.1 as my tag, but you can choose any tag you like. If you recall the Spark configuration on our Spring-Boot app, this is the image we specified Spark should use as its container:
.set("spark.kubernetes.container.image", "spark:3.3.2h.1")After the image is built, let’s load it to our Minikube cluster. From the terminal, run:
minikube image load spark:3.3.2h.1Now, lets build a Docker image for our main driver application. At the root of our project you will find the following Dockerfile:
# Use an existing image as the base image
FROM openjdk:11-jdk

# Set the working directory
WORKDIR /app

# Copy the compiled JAR files to the image
COPY word-count-driver/target/word-count-driver-0.0.1-SNAPSHOT.jar /app/word-count-driver.jar
COPY word-count-spark-job/target/word-count-spark-job-1.0-SNAPSHOT.jar /app/word-count-spark-job.jar

# Set the entrypoint command to run the JAR file
ENTRYPOINT ["java", "-jar", "word-count-driver.jar"]
All we are doing here is copying and exposing the jars of the 2 modules in our project - word-count-driver.jar and word-count-spark-job.jar and then running the driver jar as the app’s entrypoint.
In case you still haven’t build the project by running mvn clean install from the root directory, now is the time to do it.
Then, from the root directory run the following command to build the driver’s app image
docker image build . -t word-count-driver:0.0.1 -f Dockerfile --no-cacheWhen it’s done building, run the following command to load the image to Minikube:
minikube image load word-count-driver:0.0.1Deploying the app
We are now ready to deploy our application. At the root directory you will find the following deployment.yaml file:
apiVersion: apps/v1
kind: Deployment
metadata:
  name: word-count-driver-0.0.1
  labels:
    name: word-count
spec:
  replicas: 1
  progressDeadlineSeconds: 1200
  revisionHistoryLimit: 1
  strategy:
    type: RollingUpdate
    rollingUpdate:
      maxSurge: 50%
      maxUnavailable: 50%
  selector:
    matchLabels:
      name: word-count
  template:
    metadata:
      labels:
        name: word-count
    spec:
      containers:
        - name: word-count
          image: word-count-driver:0.0.1
          imagePullPolicy: Never
          ports:
            - containerPort: 8090
By applying this file to Minikube we’ll spin up a deployment named “word-count-driver-0.0.1” which runs a single pod which uses the word-count-driver:0.0.1 image as its container and listens on port 8090.
Let’s apply the deployment by running the following command from the project’s root:
kubectl apply -f deployment.yamlTesting the app
In order for us to call the /word-count endpoint on the WordCountController we first need to enable port-forwarding between the word-count-driver pod and our local host.
First lets list the running pods in our cluster to locate our driver pod. Run the following command on the terminal:
kubectl get podsFrom the output of the last command it should be easy to locate the driver pod. Here is the output in my case:
NAME                                       READY   STATUS    RESTARTS   AGE
word-count-driver-0.0.1-5857946ffb-hcmvj   1/1     Running   0          3m41s
We know we set the driver to run on port 8090 - so we’ll use the following command in order to forward port 8090 from within the Minikube cluster to port 8090 on our local host:
kubectl port-forward word-count-driver-0.0.1-5857946ffb-hcmvj 8090:8090(replace word-count-driver-0.0.1-5857946ffb-hcmvj with the name of your driver pod).
Now that port forwarding has been established we can call our endpoint to send it a text file.
- Due to the simplicity of this example, don’t send a file which is larger than 1MB, as it will fail on the controller.
Here I’m using Postman to send my endpoint a text file with the lyrics of Leonard Cohen’s Hallelujah:
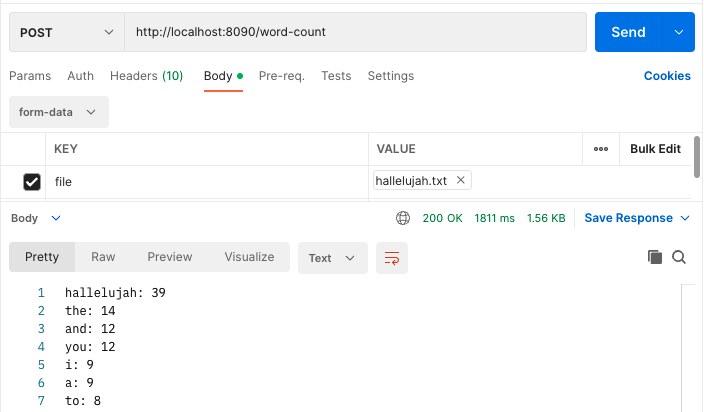
As you can see in the results, the endpoint returns the expected output.
Now, if we run kubectl get pods we should see 3 pods:
NAME                                          READY   STATUS    RESTARTS   AGE
count-words-in-file-e54936868dc85f74-exec-1   1/1     Running   0          1m17s
count-words-in-file-e54936868dc85f74-exec-2   1/1     Running   0          1m17s
word-count-driver-0.0.1-5857946ffb-hcmvj     1/1     Running   0          3m
The original driver pod and the 2 executor pods it brought up to perform the word-count job.
It’s worth mentioning that the reason the 2 executor pods are still running after the job has completed is because we are not calling sparkSession.close(); once our job is completed (I left it commented out on WordCountController).
In case we would have called it we would have been left only with the driver pod once the job has been completed.
I decided to keep the executor pods running so that I can exec into them and explore their contents and logs.
Additionally, if you want to gain better understanding of this flow and to be able to view everything in real time, it might be worth using some kind of K8S visualization UI. I used the free OpenLens software and found it very useful for this purpose.
Cleaning up
Finally, let’s clean up our local machine from everything we created for this example. Run the following command to delete the Minikube cluster along with everything we loaded to it (images, deployments, services, role-bindings ,etc..):
minikube deleteThen, you can delete the 2 docker images we created. Find the ids of word-count:0.0.1 and spark:3.3.2h.1 by running:
docker image lsOnce you have their ids, run the following command with each image-id in order to delete the images:
docker rmi <image-id>Summary
In this tutorial we saw how to deploy and run a Spring-Boot Spark application on a local Minikube Kubernetes cluster. This could be a great tool for debugging your Spark clusters or just for gaining a better understanding of all the components of such a cluster and how they work and interact.